Getting Started with Github Action
Our team recently has been discussing automatic CI-CD (Continuous Integration - Continuous Delivery). While there are other folks that have already implemented this in their workflow, this is somewhat a new thing for me.
Having to work for myself for years, I never bothered with things such as automated integration and delivery. I always do everything manually since I thought I don't need this at all.
Previously, I wrote a post about development setup for a team (read here). It was a good start to have a clean codebase and guide team members on how the codebase should look like. But there's something lacking though it's not necessarily bad.
The setup I mentioned in that post only works for local machines. Once the code is pushed to the remote repo, it will not do anything. I always have insecurity when a team member pushed a code and makes pull requests. Whether the code follows the coding guidelines, no linting errors, and all tests passed. In the end, I always copy the code into my local machine and test it manually.
This is where CI workflow comes into place. This workflow allows you to run a set of commands related to code changes. This will run after the code has been pushed to the remote repository.
This is a huge deal for me. I can be sure that the submitted code will be error-free, adhere to coding guidelines, etc.
So how do I integrate this workflow? There are a couple of different ways. Some version controls also have it natively such as Github Action and Gitlab Action (I believe other version controls have this feature too).
So, since our team uses Github, it only makes sense to use Github Actions. So I have been fiddling around with it. Turns out I can set a bunch of actions into a repository and customize which branch or events I want this action to be triggered.
Moreover, not only we can do CI workflow, but we can also set up CD workflows. This is really nice and I'm looking forward to integrating the CD part as well in the future.
Now, as a first step, I want to make sure every code change passes the following checks:
1. Linting check, no error, follows coding guideline rules
2. Passes every unit test
The goal is to make sure the code is clean, error-free, and works as it should.
So how do we tell Github to check those 2 requirements? The answer is by setting up Actions.
On the repository page, we can see a tab named Actions

From here, we can add, remove, configure, etc our workflows. The nice thing about Github Action is, that there are already a bunch of workflow templates for various types of projects and languages. So you can take a look, modify, or use it right away. The config uses yml file which is really easy to understand.
Now I want to set up a workflow for code linting. In the development setup post, I have a code linter (using eslint and prettier), I want this linter to run on every pull request of any branch.
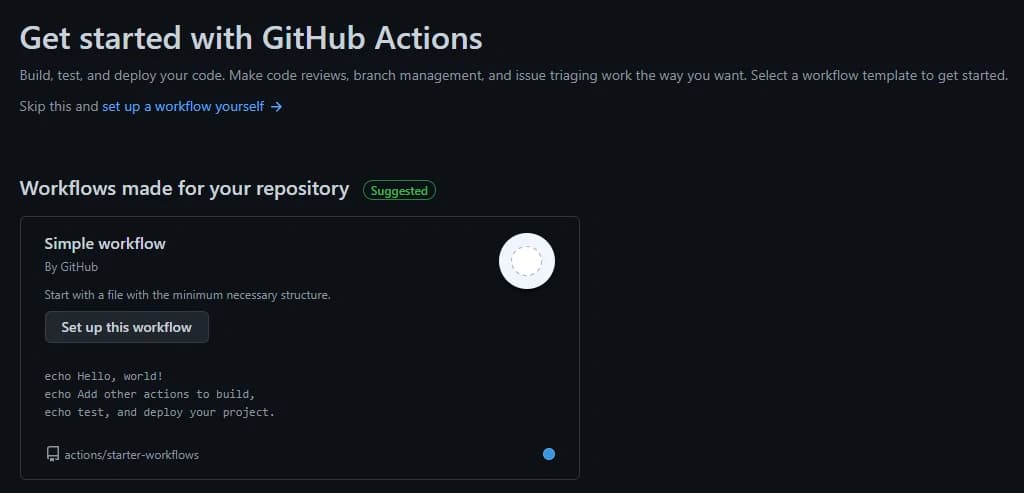
We can start by creating a workflow file. Inside the Actions tab, You will see a bunch of workflow templates you can choose from. But in this case, I will start with Simple Workflow

It will redirect you to the Github text editor and open a new file under <repo-name>/.github/workflows/<workflow-name>.yml (You can change the file name to whatever you want).
The next step is to configure. There are 3 keys for the minimum configuration
name- which is the name of the workflowon- which specifies which event will trigger the workflowjobs- a list of jobs to be executed
Now, I want to name this workflow Code Linting CI, so I will put this into the file
Copied to clipboardname: Code Linting CI
Next is to specify which event would be the trigger. As I mentioned earlier, I want to run this workflow on pull requests of any branch, therefore I will put the following snippets
Copied to clipboardon:
  pull_request:
    branch: ['*']
If you only want to run this on a particular branch(es), change '*' to the branch name, e.g [master, develop]
The last part is to specify the jobs. In this workflow, I will only have 1 job, which is to run the lint script (in this case npm run lint)
Copied to clipboardjobs:
  lintCode:
    runs-on: ubuntu-latest
    strategy:
      matrix:
        node-version: [12.x, 14.x, 16.x]
    steps:
    - uses: actions/checkout@v2
    - name: Use Node.js ${{ matrix.node-version }}
      uses: actions/setup-node@v2
      with:
        node-version: ${{ matrix.node-version }}
        cache: 'npm'
    - run: npm ci
    - run: npm run lint
The lintCode is the name of the job (change to whatever suits the actual job). Then we have runs-on, which will specify which operating system this job will run on. Github gives you a free quota for using their runners (read more), You can also host your own runners but I will not cover that in this post.
strategy is used to configure the nodejs versions the job will run with. You might want to use one or more (in this case, it will be on 3 different versions of nodejs)
The last thing is steps, which specify, well, the steps of the job. I have 3 steps there that are self-explanatory.
uses: actions/checkout@v2 will check out Your repository under $GITHUB_WORKSPACE, so Your job can access it. So just use it in every workflow You have.
Copied to clipboard- name: Use Node.js ${{ matrix.node-version }}
  uses: actions/setup-node@v2
  with:
    node-version: ${{ matrix.node-version }}
    cache: 'npm'
This snippet tells You which node version is currently being used and provided by Github.
run:, will run the specified command. In my case, I want it to install the dependencies, so I put npm ci, or You can use npm install if You prefer. The second run: command will run npm run lint which is specified in my package.json scripts.
It's not only limited to running npm commands, you can basically run any command (as long as it's supported by the OS runner and properly configured).
Together, the config file will look like this
Copied to clipboardname: Code Linting CI

on:
  pull_request:
    branch: ['*']

jobs:
  lintCode:
    runs-on: ubuntu-latest
    strategy:
    matrix:
        node-version: [12.x, 14.x, 16.x]
    steps:
    - uses: actions/checkout@v2
    - name: Use Node.js ${{ matrix.node-version }}
      uses: actions/setup-node@v2
      with:
        node-version: ${{ matrix.node-version }}
        cache: 'npm'
    - run: npm ci
    - run: npm run lint
It's done! The last thing is to commit this file to the repository. Now, every time someone makes a pull request, it will trigger this action and will be referenced on the pull request page.
Whether the job succeeded or failed, it will be updated on the PR page

When the test fail

When the test success
I don't have to copy the codebase into my local machine just to check the codebase now. Gihtub helps me skip this section and I can move on to code review.
Say You want to have another workflow which is to run a unit test when someone pushes code to the master branch. How do you do that?
Again, start by adding a new workflow file and putting the config
Copied to clipboardname: Unit Test

on:
  push:
    branch: [master]

jobs:
  runUnitTest:
    runs-on: ubuntu-latest
    strategy:
      matrix:
        node-version: [12.x, 14.x, 16.x]
    steps:
    - uses: actions/checkout@v2
    - name: Use Node.js ${{ matrix.node-version }}
      uses: actions/setup-node@v2
      with:
        node-version: ${{ matrix.node-version }}
        cache: 'npm'
    - run: npm ci
    - run: npm run test
The difference is, that it will run this workflow only when a push happens in the master branch (because that's how I configured it in this file). But again, You might want to run the test in every branch, or every pull request, it's up to You and You can change it accordingly.
Well, this is just the beginning of adding an automated workflow to your project. There are a lot more that you can do besides these 2 examples. Every project may vary but You can configure them easily and the docs is easy to understand.
Hopefully, this post is also easy to understand lol.